Created By: Game Audio Resource Ltd Date: 28/08/2019 Version: 1.00

In this new guide, we will outline a basic music system.
NOTE: This is a long detailed guide,more than one coffee will probably be needed!! 😉
We are slightly limited to the default project variables available and no extra code being added.
However, this again shows the creative freedom and the possibility of Wwise with limited resources available.
Music can be implemented in a wide variety of way. This guide offers an easy simple overview for people looking to learn the basics of Wwise music processes.
Wwise has a great tutorial series, covering many extra processes that we do not cover in this guide series.
Please visit the link below for more music details
https://www.audiokinetic.com/courses/wwise201/
Guide Steps:
- STEP 01: Create Music Assets
- STEP 02: Reminder – Previous Setup Data Properties
- STEP 03: Interactive Music Layout
- STEP 04: Wwise Hierarchy Structure
- STEP 05: Test
- STEP 06: Diagnose Incorrect Music Tracks Being Triggered.
Task Time Needed: Around 4+ Hours (without music tracks creation)
Video Guide
Written Guide
CHAPTER 06 B – STEP 01
Create Music Assets
Before we begin, you will need to create various music tracks.
For this music system we will be implementing, you will need the following track types:
> Gameplay Map Intro Loop – To trigger only when the map loads
> Gameplay Explore Loop – To trigger when no enemies to fight.
> Gameplay Combat Loop – To trigger when fighting enemies
> Gameplay Quad Loop – To trigger when the player is under quad ability
> Results Victory One shot – To trigger when a map is won
> Results Defeat One shot – To trigger when a map is lost
> Transition To Combat One Shot – To trigger when music is changing to combat music
> Transition To Explore One Shot – To trigger when music is changing to explore music
- TIP: Transition stings help music tracks blend into each other when music tracks are changed.
(You don’t have to add transition music stings, but it is good practice experience how they function)
Regarding Tempo:
You will need to note each tracks tempo (e.g. 120BPM) and bars (e.g.4/4) in the filename. This helps set up the tracks in Wwise.
E.g. MUS_Combat_Loop_120BPM_4_4.wav
Loops can be as long as you wish.
Transitions: aim them to be around 1 bar long, the shorter the better.
Once you have your music tracks created, files named, loops without clicks, etc.. move onto the next step.
CHAPTER 06 B – STEP 02
Reminder – Previous Setup Data Properties
We have set up a lot of Wwise data properties needed for music to be implemented (mainly Chapter 14, but 04 & 05 set up the base hierarchy)
Please ensure you have reviewed & setup the properties needed highlighted in those guides before you continue onto the main music implementation.
CHAPTER 06 B – STEP 03
Interactive Music Layout
For music implementation Wwise has a unique Layout with different processes and structuring than what you have seen in this guides series
In this step we will quickly review the interactive music layout.
- In the Wwise tool bar select Layouts > Interactive Music (F10 on your keyboard)
- You will recognise the Project Explorer window to the left. This is where you will still find all you SFX content, Events, game parameters, etc… (and the new music content)
- Below it you will now have a compact version of the transport control to audition music in Wwise.
- To the far right you will have the usual Master Audio Bus meter.
- In the middle we have 2 main windows we will work with
As we have not yet implemented anything for music, nothing will be displayed here.
* Property Editor
This is where we will assign what tracks can go to which other music track, when the game sends a call to Wwise.
We also add music transition here. Basically how a music tracks changes to a different music track.
Music stingers can also be setup here. However, for simplicity we have decided not to include them in this guide.
* Association Editor
This is where we assigned Wwise switches and states to list out path variables of the parameters in each state or switch, so that we can tell Wwise which music track to play in which situation.
This covers the basics of the music system details that we will be covering in this guide
CHAPTER 06 B – STEP 04
Wwise Hierarchy Structure
This step will be quite long, we will break it up into content sections to aid simplicity.
First, we start implementing the basic Wwise hierarchy structure.
HIERARCHY
- Navigate to the Project Explorer > Audio tab > Interactive Music Hierarchy WWU.
Right click the Music WWU, select New Child > Music Switch Container.
Name it: Music Global - With the Music_Global Switch Container selected in the Property Editor > General Settings tab > Output bus assign the Music Audio Bus.
- Right click the new Switch Container then select: New child > Music Playlist Container
- Copy this Music Container, so that you have 9 empty containers.
Name them individually the following
> MUS_Gameplay_Boss
> MUS_Gameplay_Combat
> MUS_Gameplay_Explore
> MUS_Gameplay_Intro
> MUS_Gameplay_Quad
> MUS_Results_Defeat
> MUS_Results_Victory
> MUS_Trans_To_Combat
> MUS_Trans_To_Explore - Drag in each of your music loops and transitions to the association container.
Place the assets under the path: SFX > Music. - Select & expand the hierarchy of the MUS_Gameplay_Combat Playlist Container
- Then in the Playlist Editor, drag in the child music track loop under the Group/segment > Sequence Continuous group.
- As we only have one loop to play. Set the loop count of the Sequence Continuous group to 0 (infinite)
For the music track, set the Loop Count to 1.
- TIP: What this does is tell Wwise when this content is called to play, continually loop the music track assigned.
- Then apply the same setting in Points 5 > 7 to the following containers:
> MUS_Gameplay_Boss
> MUS_Gameplay_Explore
> MUS_Gameplay_Intro
> MUS_Gameplay_Quad - For the results and the transition containers. We add the same process in steps 5 > 7 but we will not need to loop values for these tracks as they are one shot assets.
In the Playlist Editor, change the line Sequence Continuous Group > Loop Count to 1.
- TIP: This means the child music track will only play once.
- We need to assign the Tempo & beats to each track so that When tracks changes, they change on a consistent beat.
Select the MUS_Gameplay_Combat Playlist Container. Then in the General Settings tab > Time Settings.
Tick the Override parent
Then add the tracks tempo and Time Signature. E.g. 120 & 4/4
This will then be passed down to all child tracks.
If you open the child Music Segment Container, then click on the music track.
You will see the music track will then match the time signature of the parent track.
- TIP: This makes it easier to add precise tweaks towards the end of this guide & polishing the final music mix.
- Now add step 11 points to all Playlist containers.
- Save your Wwise Project updates.
TRANSITIONS
- In the Project Explorer > select the Music_Global Switch Container.
- Then in the Property Editor select the Transitions tab.
- Wwise needs to be told which music track can go to which music.
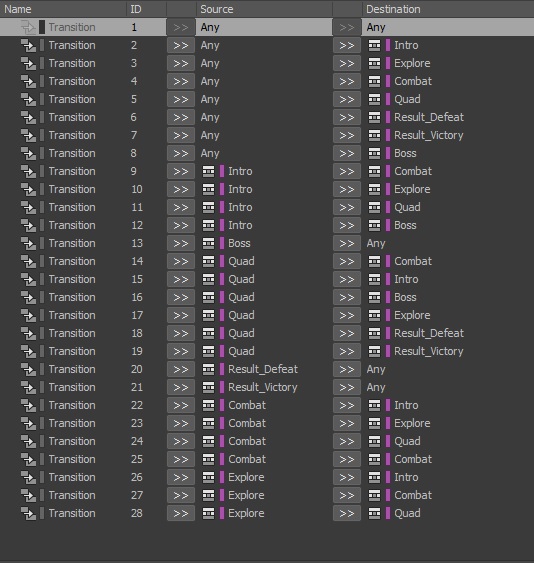
- Click the Add transition UI button 27 times which will add 28 entry lines to the list.
- TIP: Always leave the first list set at Source: Any and Destination: Any.
- Select the ID2 entry. Then in the Project Explorer window drag the MUS_Gameplay_Intro container onto the Destination column.
ID2 / line 2 should then look like this
Source: Any & Destination: Intro. - Next we need to assign all variables to this list.
For simplicity use the list below to drag in all properties need.
Update the list with the following variables:
- Select the entry line ID2. Then under Source change Exit source at: to Immediate.
– TIP: This means when the music track changes, it will change instantly.
Once you have finished this guide, you may need to come back to this setting and change a few entries to be possible change on e.g. Next Bar, this would allow a smoother flow of the music beat and bars. - Next we will add a fade out to track currently playing when the game tells Wwise to change to another track.
Select the Line label ID 9 – Source: “Intro” & Destination: “Combat”
Then under Source Tick the Fade out box
Click the Edit button,
Then add under Fade > Time add a value: 2. Also under offset add a value: 2.
Change the curve to a logarithmic curve.
Close the Source Fade-out window.
- TIP: What this does is when the track is ordered to change by the game. The current playing track will fade out for 2 seconds. The incoming new track will play instantly.
Finding the sweet spot will take a bit of trail and error based on your music tracks.
If you would like the incoming track to have a fade in, simply under destination, click the Fade-in box. Then click the Edit button.
In the Source Fade-in window, change the values to work with your music tracks.
- Now go through all entries in the list assigning a fade in or out to each transition of music tracks.
Also assign how quickly each track will change to another track with the Source > Exit source at: drop-down menu. - Next we set up the transition music one shots tracks to play when certain tracks change from one track to another.
Select the Line label ID 9 – Source: “Intro” & Destination: “Combat”
Under the Transition segment add the following
Tick Use transition segment
Click the path button then assign the Transition_To_Combat one shot sting music track (NOTE: You can only assign music tracks not Playlist Containers)
Tick Play transition pre-entry
Tick Fade in
Click the Edit button
Under Fade > Time add a value of 0.3.
- TIP: This adds a 0.3 second fade-in to the one-shot transition sting. You may not need to use this as it will depend on the music you have created. Once we start testing in Step 05 you will be able to fine tune all settings based on what you hear in game.
Tick the Play transition post-exit.
If you wish to have a fade out to the one-shot music sting the tick the Fade out box and edit the fade out time via the Edit button
- You can now populate the full Property Editor list with which transitions you would like the one-shot music stings to occur on.
- Save the Wwise Project updates
SWITCHES
We move on to an important part of the hierarchy, setting up the switches.
This tells Wwise which music track to play under the switch variable we will now assign
- Select the Music_Global Switch Container.
- Then in the Association Editor, drag the window to the top of the screen.
- TIP: This aid viewing of the content we will be assigning.
Return the window to its normal size at the end of this step.
- Click the arrow button then assign the following path
State Group > Music > Music State - Click the arrow button then assign the following path
State Group > Default Work Unit > Player Life - Click the arrow button then assign the following path
State Group > Default Work Unit > PlayerHasQuad - We need to create unique paths for all of these variables.
Click on Music State, hold Shift then Click Results_Victory (last entry in the list)
Continue to hold shift then select the first and last entry in each of the switch list variables. - Click on Add Path(s)
The list at the bottom of the screen is now populated with all the paths available from the switch list variables.
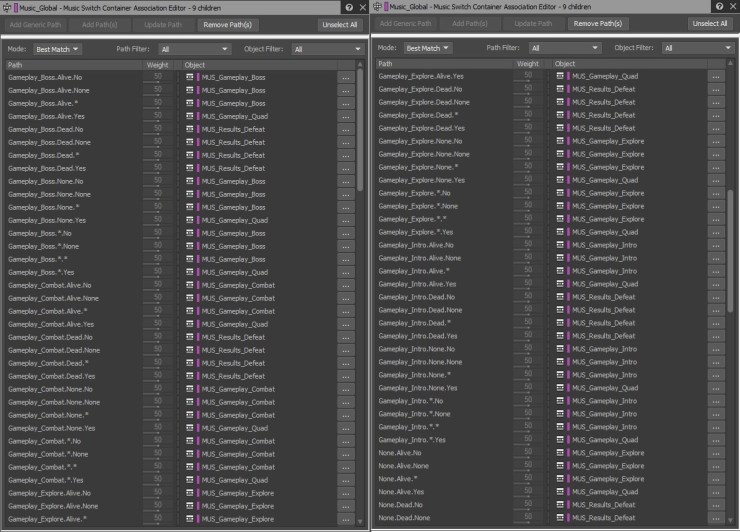
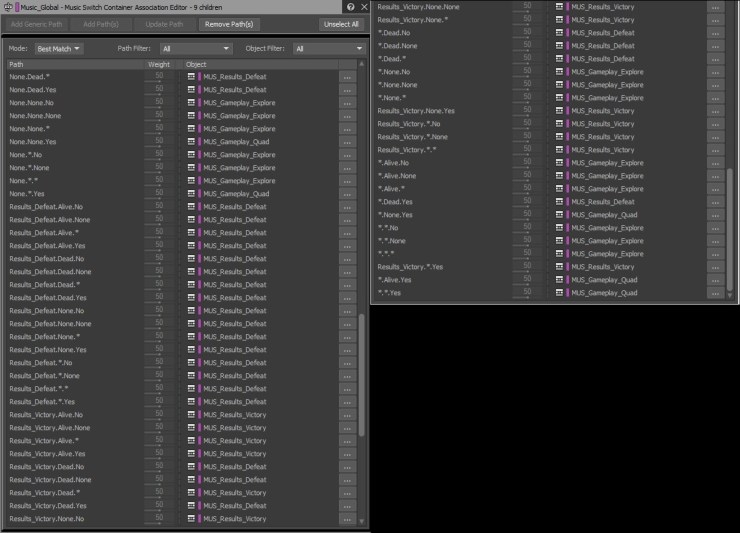
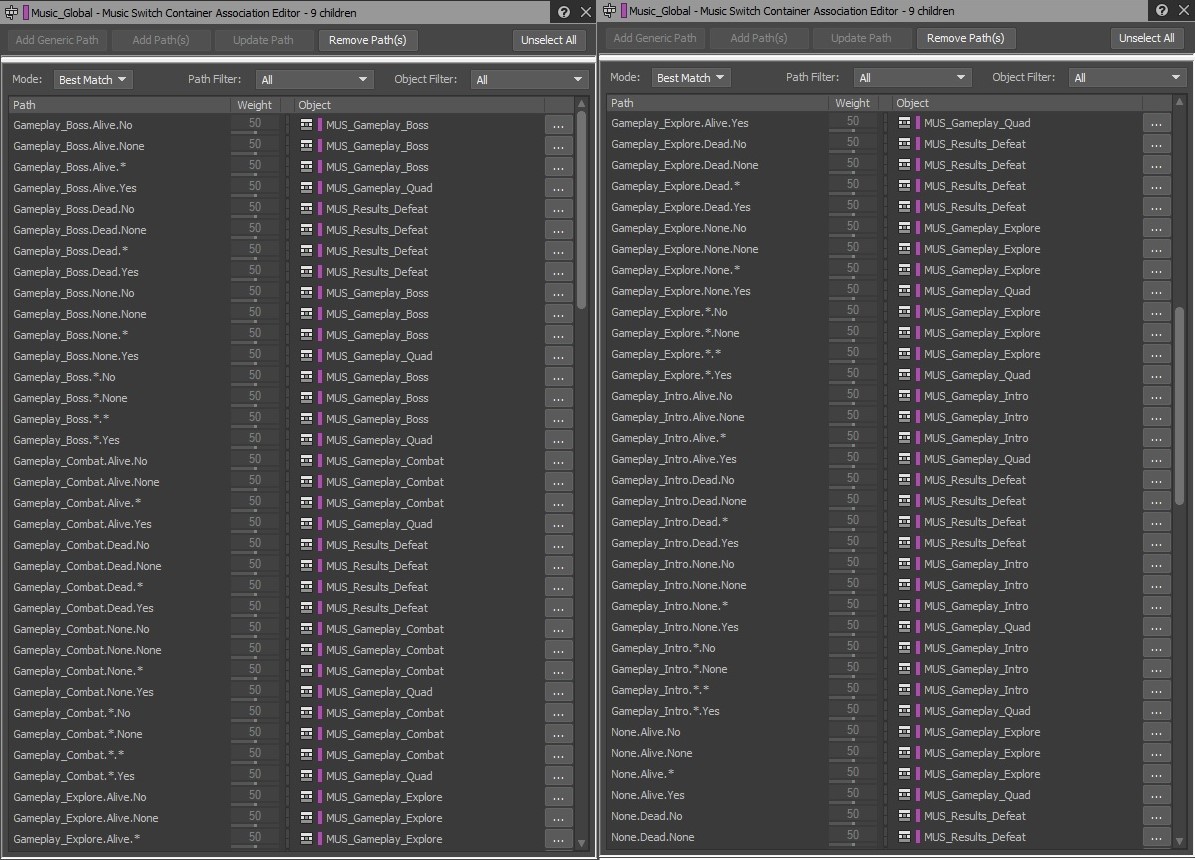
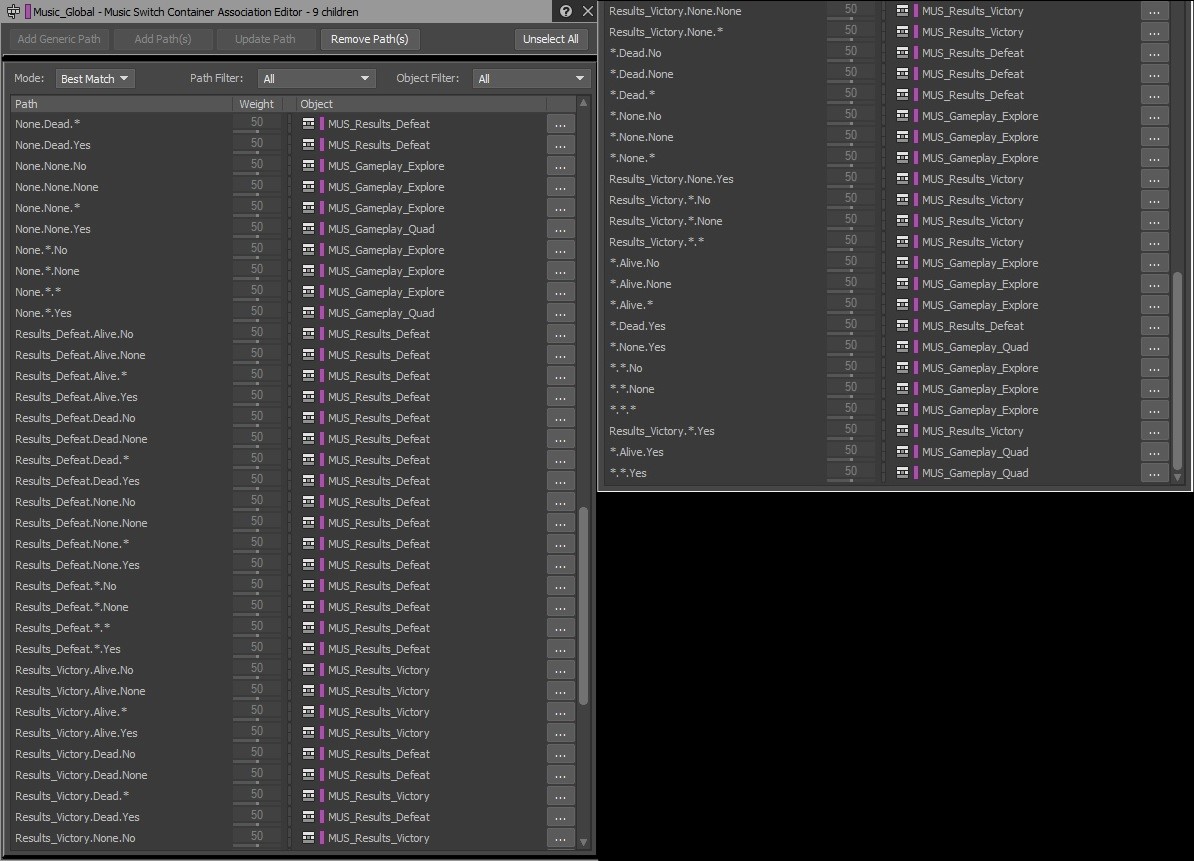
We need to assign each of the music tracks to the listed paths.
g. the first path in the list
Gameplay_Boss.Alive.No
- TIP: What this path means is:
Gameplay Boss = Music State
Alive = PlayerLife State
No = PlayerHasQuad State
- Drag the MUS_Gameplay_Boss Playlist Container from the Project Explorer hierarchy onto the associated entry line, Object Column.
- TIP: This means when the Game informs Wwise the game has entered a boss trigger, if the player is alive and not under the quad ability, Wwise should then trigger the MUS_Gameplay_Boss music tracks associated under Playlist Container.
- There are a lot of entries in this list to populate!
For simplicity please use the screen shot below of what to assign to each entry path in the list:
TEST
We have now set up the basic music hierarchy so we can test in Wwise if the hierarchy works.
- Select the Music_Global Switch Container.
- In the transport control, click on the states tab. Then assign the following variables
Music_State: Gameplay_Intro
PlayerLife: Alive
PlayerHasQuad: No - Now press play, you should hear the intro music track playing.
With the track playing let’s change to a different music state to see what happens.
Change to the Gameplay_Combat.
You should hear a transition (If you have set it)
Then the combat loop start to play. - Spend a bit of time testing out all transitions and how tracks feel playing together.
Use all the above guide info to make any changes needed.
EVENT
- In the Project Explorer > Events tab, find & select the event called: Map_Loaded
- Then in the Event Editor > List, right click then select: New Action > Play.
- Navigate back to the Audio tab > Music_Global Switch Container, then drag it onto the new Events Play Action line.
- Save your Wwise project updates.
- Change to the SoundBank Layout (F7) Drag the Music_Global Switch container into the Main Sound Bank.
- Then generate the sound banks.
– TIP: You should see briefly in the Generating SoundBank window, the music files be converted in the Operation list.
CHAPTER 06 B – STEP 05
Testing
We can finally check if music is heard in game!
- Boot up the game and content Wwise to the game
- In Wwise change to the Profiler layout and filter the Capture Log by the Music WWU.
- Solo the Music_Global Switch Container
- Back in game, Load a new map single player map
- Play test the game!
Write down any notes of things you hear you want to change or tweak.
Use this guide to help make those tweaks.
CHAPTER 06 B – STEP 06
Diagnose Incorrect Music Tracks Being Triggered
Lastly, you may find the odd time when music does not change to the correct track. This is mainly down to the Association Editor.
This final step will guide you through how to diagnose and fix this issue.
- Boot up the game and connect Wwise to the game.
- In Wwise change to the Profiler layout and filter the Capture Log by the Music WWU.
- Solo the Music_Global Switch Container
- Keep an eye on the Capture log entries. When you hear the wrong music track triggered,
Stop the Capture Log profiling the game.
This will freeze the logs info. - We can now look at the Capture Log last entries (bottom of the list) for what music variables where triggered.
In this example case: Gameplay_Explore.Alive.No appears to be the culprit.
NOTE: In Scripted maps (e.g. DCP_The_Core) if we change this variable in the next steps.
The scripted maps music will never return to Explore state.
Please take the next steps as a guide to fix incorrect music in the future only. - If we return to the Interactive Music Layout & select the Music_Global Switch Container.
Then the association Editor we shall look for the same named variables.
We can see that the Gameplay_Explore.Alive.No is set to play the Explore music Track, Which is correct. But we want the combat music to play, simply drag in the MUS_Gameplay_Combat Playlist Container. - Save your Wwise Project updates & Generate the Sound Banks.
- Test in game the update. The music should now change to the correct music type.
NOTE: Some variables can be misleading, be careful when changing music tracks as a knock-on bug could occur somewhere else in the game.
Great work! You have now set up a full basic music hierarchy.
Extra Music System Examples
There are many different ways to implement music.
Here are a few quick examples:
Example 1:
2 same tracks but 1 track has more intensity (different drums, moving chugging bass line, etc..)
Wwise can swap to the same point in another track.
e.g. a Low intensity track for Explore
a High intensity version of the base low track (different drums, etc..) for combat or quad
When combat or quad is called using Destination > Sync to > Same Time As Playing Segment.
The next track would continue to play from the same point (bars/beats) in the next track where it left the last track.
Example 2:
Using instrument individual layers/tracks/stems.
When tracks change swap out different instrument layers.
e.g. Explore state = could be a synth melody and separate odd drum beat.
When combat starts, swap out the drum beat for a more aggressive version to play with the synth melody
