Created By: Game Audio Resource Ltd Date: 10/06/2019 Version: 2.00

This guide will highlight how to implement a new reverb type to the existing default types available.
Also, the guide will show you how to implement reverb zones into a map.
Guide Steps:
- STEP 01: Enable Reverb on Test Content
- STEP 02: Wwise Data
- STEP 03: Cube Data & Script
- STEP 04: Cube Tagging Reverb Zones In Maps
- STEP 05: Test
Task Time Needed: Around 15>20 minutes per map. Around 2 weeks to tag all 100+ maps.
Video Guide
Written Guide
CHAPTER 06 B – STEP 01
Enable Reverb on Test Content
Before we begin, you will notice reverb is not playing in the default map Metl3 for the test footsteps.
This is due to one simple setting in Wwise
To enable any game wide SFX, or Dialogue to use the reverb zone effects in Wwise data ensure game defined auxiliary sends is ticked on the content you want to use the reverb effect.
For Example:
- Navigate to the Placeholder_TEST folder.
- Then select the TEST_Footstep, in the property Editor > General Settings tab, find the Game-Defined Auxiliary Sends section.
- Then ensure Use game defined auxiliary sends is ticked.
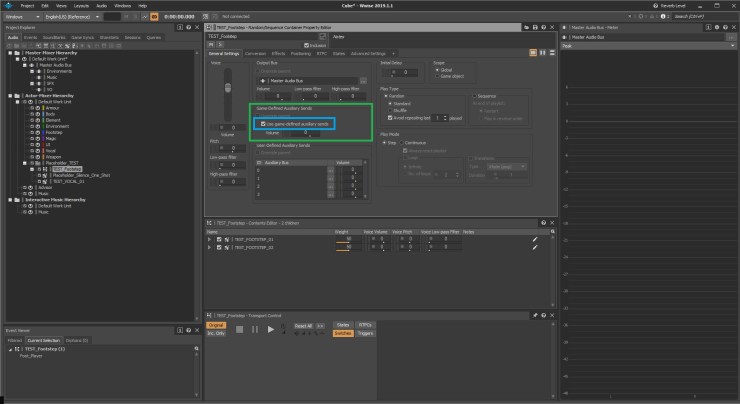
This is will enable the reverb zones we implement in this Chapter’s guide. - Then enable reverb on the TEST_Vocal_01 container, with the above steps
- Generate the sound banks & Save the Wwise updates.
- In game test the default map (Metl3). Listen to the assigned test footstep assets. default set-up reverb zones should now be heard (where the zones have been implemented with the original downloaded project) as the player moves around the map.
TIP: In a professional studio reverb’s most probably will be handled quiet differently.
If an audio coder is available, you may have a hard-code solution using attention aux sends to handle reverb in an external database process or something similar to the cube game where you will tag map zones. Reverb can be hugely costly on playback, so optimising reverb is an important part of the final mix and the overall audio performance.
CHAPTER 06 B – STEP 02
Wwise: Adding New Reverb Types
When we cleaned up the project, we have purposely left the default reverb zone data and will now add a new reverb zone type & update the naming conventions
- Change to the Layout > Designer (F5)
- Navigate to the Project Explorer > Sharesets tab.
- Open the hierarchy Effects > Default Work Unit.
(These are the list of the currently 4 default reverb types)
First let’s rename the content
env_small_room becomes: REV_ENV_1_Room_Small
env_medium_room becomes: REV_ENV_2_Room_Medium
env_large_room becomes: REV_ENV_3_Room_Large
env_corridor becomes: REV_ENV_4_Corridor - Let us add a new one.
Select and copy any one of the reverb types. E.g. REV_ENV_3_Room_Large - Paste the copy into the same location under Effects > Default Work Unit.
- Rename the container REV_ENV_5_Outside
- Double click the container to bring up its properties.
NOTE: You will not be able to hear the effect at this time.
For now, change the values to the match the screenshot below & close the window.

- In the Project Explorer > Audio Tab.
Locate the Master-Mixer Hierarchy > Master Audio Bus > Environments Audio Bus. Rename it Reverb - In this Audio Bus, you will see the 4 default reverb types using the original naming convention
We need to again rename these to match the FX names we added in the ShareSets tab.
e.g. env_large_room will become REV_ENV_3_Room_Large
Use the naming conventions we have just added in the ShareSets tab.
- TIP: It is important to match the naming convention correctly for hierarchy consistency.
- Next copy one of the reverb Audio Busses
- Select the new aux Bus to bring up the properties in the Property Editor panel.
Select the Effects tab. - In the Effects list there is one entry of which reverb type is assigned to this Aux bus.
Double click the item in the Name column, then select the new effect (REV_ENV_5_Outside) - Generate the sound banks and save the Wwise project updates
Wwise is now set up with a new reverb type + the 4 default types.
CHAPTER 06 B – STEP 03
Cube: Data & Script
Next, we need to assign the new reverb type to a map to get the reverb working in game.
TIP: If you assign the different reverb zones to the default_map_settings .cfg script file (Cube/Cube/data folder) the data is then loaded into all maps.
This saves you having to copy the data listed in this step into each individual map.
- In your directory locate this file “:\\….\Cube\cube\packages\base\metl3.cfg”
- TIP: All map .cfg file will be found in this folder: “:\\….\Cube\cube\packages\base\”
You may need to add new ones if a map does not have one. Simply copy one and rename it to match the map name.
- Open the map in Notepad++ (easier to view than notepad standard)
In Notepad++ toolbar select languages, then select the format to be XML. - You will see the 4 default reverb zones already set up.
First we need to rename the reverb event names to match our new naming convention mentioned in step 02.
Example: env_large_room will become REV_ENV_3_Room_Large - Copy one line 7 add it under the 4th reverb entry.
Then rename it to match the name of the new Outside reverb we have added. (REV_ENV_5_Outside) - To aid quick view add //5 at the end of the line consistently to the above script lines.
- Now we know that:
Reverb Type 1 = Small Room
Reverb Type 2 = Medium Room
Reverb Type 3 = Large Room
Reverb Type 4 = Corridor
Reverb Type 5 = Outside (Our new reverb type) - Save the script, File > Save in Notepad++ toolbar or press CTRL + S on the keyboard.
Not mentioned in video:
to save you adding the reverb zones to each maps script, also add all reverb types listed in the above xml to the Cube/cube /data > Default_map_Settings file.
This should enable reverb in all maps (as long as the map has been tagged with reverb zones)
CHAPTER 06 B – STEP 04
Cube: Tagging Reverb Zones In Maps
The last step is to tag the reverb zones into each map
NOTE: This is a manual process and will take some time to complete, if you plan to tag all 100+ maps.
- Boot up the games default map (Metl3)
- Press E on your keyboard to bring up the map edit mode.
- Select a square with the mouse left click. Hold the click, then drag out a selected area you wish to assign a reverb zone type to. Release mouse left click
- With the area selected, press ¬ on your keyboard to bring up the command input.
- Now type setwwiseenv 4, Then press enter.
You have now assigned the corridor reverb type (number 4) to the selected area. - Press E to exit edit mode. Now move your player character in and out of the new reverb zone. You should hear the reverb being applied in the new area only.
- If you are happy with the new reverb zone. Save the map updates.
Press ¬ on your keyboard. Then type savemap, followed by pressing enter.
A wrote map file message will appear in the top left part of the game window. - The reverb effect is now fully implemented into the map.
This is a good point to start testing out the different reverb types and tag up the default map Metl3 with the different reverb’s available.
CHAPTER 06 B – STEP 05
Test
Once you have implemented reverb zones for a full map, added all Wwise new reverb zones you wish to use and scoped the game maps for design needed, Test the map.
If you are happy with your implementation added, progress on, tagging other maps with reverb zones. Try to stick to the principal process you have implemented with your first map. To keep a consist soundscape throughout the game world.
Scope how many maps you will tag with reverb. Add a task time estimation to the Project tracker + schedule when you will do the task.
(Example: 50 maps a week, 10 maps a day, 2-week full block task
