
Created By: Game Audio Resource Ltd Date: 09/11/2019 Version: 1.00
Wwise Unreal: Chapter 03 C –
Environment: Reverb Zones
In this guide we set up a basic Outside reverb Wwise effect to trigger all over the map, affecting any content triggered in the reverb zone.
Please Note
You will not be able to reliably test the reverb value settings this guide implements, until we have 3D sounds triggering in the map. In Chapter 04, once animations are tagged with Wwise Events, you will have a set of reliable content to adjust reverb settings with.
GUIDE STEPS:
- STEP 01: Wwise Hierarchy
- STEP 02: Unreal Hierarchy
- STEP 03: Emitter Map Tagging
- STEP 04: Test
Download the free associated written guide:
Wwise_Unreal_Chapter_03C_Environment_Reverb_Zones
Video Guide
Written Guide
STEP 01:
Wwise Hierarchy
First we set up a Wwise reverb effect
- Navigate to the Project Explorer > ShareSets tab > Effects folder > Default Work Unit.
Right click, then select: New Child > Wwise RoomVerb
Name it: FX_REV_Outside - Double click the FX to open the properties.
Then in the Effect Editor
Change the Room Size to 20
Then close the window
– TIP: You can come back to these settings later on in the guide series once we have character content triggering in the world space, to help hear & adjust the reverb value settings in-game. - Navigate to the Audio tab > Master-Mixer Hierarchy > Default Work Unit > Master Audio Bus > Reverb Audio bus
Right click the audio bus, then select: New Child > Auxiliary Bus.
Name it: FX_REV_Outside - With the new Audio Bus selected, in the Property Editor > Effects tab, click on the ID0 >> UI Button. Then assign the following path:
WwiseRoomVerb > FX_REV_Outside - Next we example how to enable SFX content in Wwise to use this FX reverb type in the world map.
Navigate to the Audio tab > Actor-Mixer Hierarchy > Default Work Unit > Environment > ENV_Wind Actor Mixer.
With the ENV_Wind Actor Mixer selected, in the General Settings tab > Game-Defined Auxiliary sends, tick the Use game-defined auxiliary sends tick box. - Also tick the same tickbox on the ENV_Water_Splash Actor Mixer
– TIP: To enable the Aux Bus Reverb effect on any content in game (once we have implemented an associated reverb zone in Unreal), we need to simply tick one box in Wwise on the parent container of any hierarchy we wish to use the reverb FX. - Generate the Sound Banks and Save your Wwise Project updates.
STEP 02:
Unreal Hierarchy
In this step we add the Wwise associated content to unreal hierarchy.
Allowing us to tag the reverb effect into the world map
- In unreal, open the WwisePicker
Navigate to: AuxBus > Default Work Unit > Master Audio Bus > Reverb > FX_Rev_Outside
Drag this Aux Bus into the following Location
Content Browser tab > Content > Audio > Wwise_Busses > FX_Reverb Folder - Double click the Aux Bus, then assign it to the SB_Environment Sound Bank
- Save the FX_REV_Outside Aux Bus update.
- Generate the Unreal Sound Banks
- In the popup message in the lower right of the screen, click to import the updated Sound Banks.
STEP 03:
Emitter Map Tagging
In this step we guide you through how to place a Reverb zone into the map using emitter box zones.
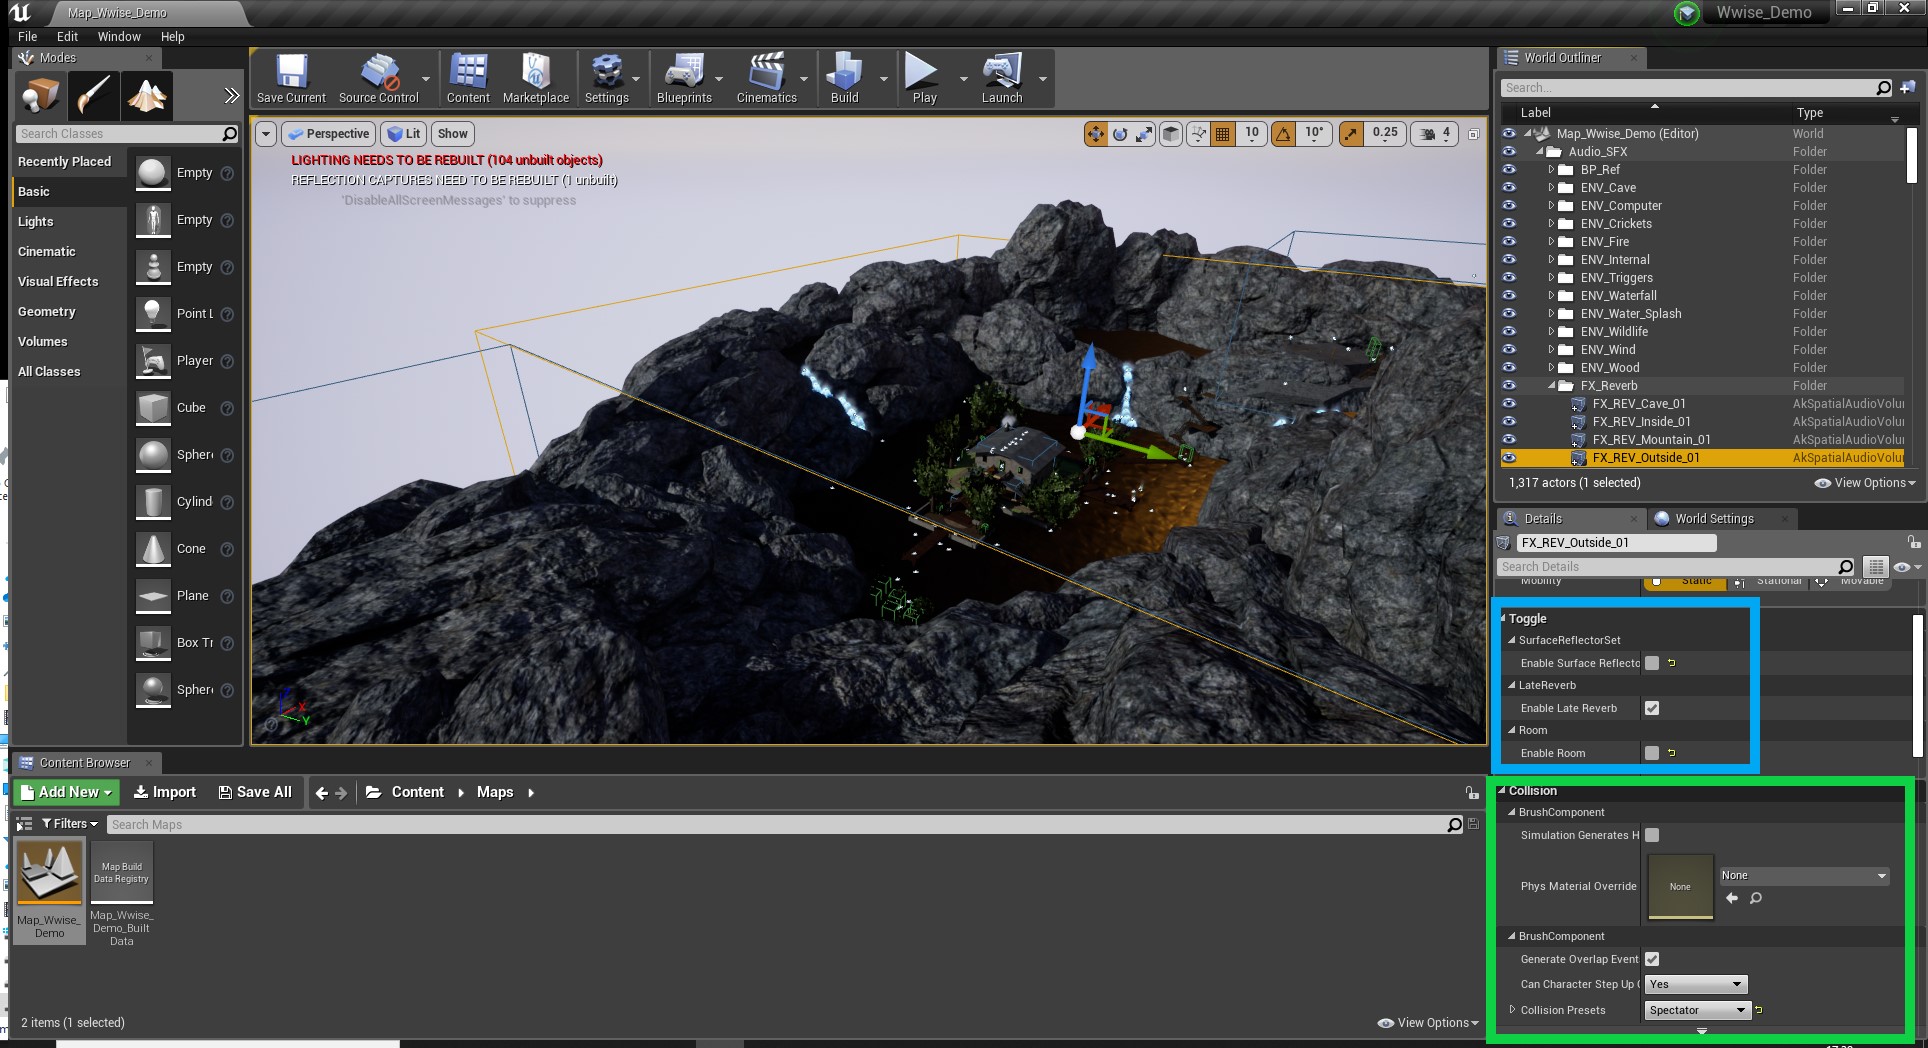
- Open the map you are working with, in the Modes tab > Place > All Classes > select and drag into the map the AK Spatial Audio Volume Class. Place it somewhere in the middle of the map.
- With the Class selected in the World Outliner, in the Details tab, add the following settings:
First set the size of the reverb box zone.
Under Transform: set the following Scale values:
> X = 50
> Y = 50
> Z = 25
The box should surround your entire map area.
Under Toggle: ensure only Late Reverb > Enable Late Reverb is ticked.
Under Late Reverb > Aux Bus assign the new FX_REV_Outside reverb FX in the menu
Under Collision > Brush Component > Collision Presets, in the drop-down list change to Spectator.
– TIP: If you leave Collision Presets as Overlap All, projectiles from the gun will not spawn inside the reverb box zone, (e.g. from the gun) Instead they will spawn at the closest reverb box edge point.

- In the World Outliner, Right Click the Audio_SFX folder., then select: Create Sub Folder.
Name it: FX_Reverb - Drag the Reverb entry into the new Reverb Folder
Then rename the Class to FX_REV_Outside_01 - Save the map updates
STEP 04:
Testing
As we do not yet have any 3D events implemented into the map, we cannot easily test how the reverb settings sound.
Play the map, move the character over to the water splashes emitter we implemented in Chapter 03B.
You may slightly hear reverberance with the audio asset.
However, we suggest to return to adjust the reverb value settings once you have tagged animations with vocal content in the next Chapter (04) of this guide series.
Implement different Reverb types for use in the map to enhance the global soundscape.
– TIP: If you would like a different reverb zone for the inside of the small house, place a reverb zone box around the house perimeter. In Wwise set up an internal sounding reverb for use inside the house, then associate the new internal reverb to the box reverb zone.
Then place reverb boxes around the outside of each house wall to the edge of the map, using the REV_Outside reverb Wwise FX.
This will then give the soundscape 2 defining reverberant areas.
